SourcePoint Intel Help
Table of Contents
- Using Help
- Contacting ASSET InterTech
- Introduction to SourcePoint
- SourcePoint Environment
- SourcePoint Overview
- SourcePoint Parent Window Introduction
- SourcePoint Icon Toolbar
- File Menu
- File Menu - Project Menu Item
- File Menu - Layout Menu Item
- File Menu - Program Menu Item
- File Menu - Macro Menu Item
- File Menu - Print Menu Items
- File Menu - Update Emulator Flash Menu Item
- File Menu - Program Target Device Menu Item
- File Menu - Other Menu Items
- Edit Menu
- View Menu
- Processor Menu
- Options Menu
- Options Menu - Preferences Menu Item
- Options Menu - Target Configuration Menu Item
- Options Menu - Load Target Configuration File Menu Item
- Options Menu - Save Target Configuration File Menu Item
- Options Menu - Emulator Configuration Menu Item
- Options Menu - Emulator Connection Menu Item
- Options Menu - Emulator Reset Menu Item
- Options Menu - Confidence Tests Menu Item
- Window Menu
- Help Menu
- How To -- SourcePoint Environment
- Add Emulator Connections
- Configure Custom Macro Icons
- Configure Autoloading Macros
- Display Text on the Icon Toolbar
- Edit Icon Groups to Customize Your Toolbars
- Modify a Defined Memory Region
- Refresh SourcePoint Windows
- Save a Program
- Start SourcePoint With Command Line Arguments
- Use the New Project Wizard
- Verify Emulator Network Connections
- SourcePoint Overview
- Breakpoints Window
- Breakpoints Window Overview
- How To - Breakpoints
- Code Window
- Command Window
- Command Window Overview
- Confidence Tests Window
- Confidence Tests Window Overview
- Descriptors Tables Window
- Descriptors Tables Window Overview
- How To - Descriptors
- Devices Window
- Devices Window Overview
- How To - Devices Window
- Log Window
- Log Window Overview
- Memory Window
- Memory Window Overview
- How To - Memory Window
- Page Translation Window
- Page Translation Windows Overview
- PCI Devices Window
- PCI Devices Window Overview
- How To - PCI Devices Window
- Registers Window
- Registers Window Overview
- How To - Registers
- Symbols Windows
- Symbols Window Overview
- How To - Symbols Window
- Trace Window
- Trace Window Overview
- How To - Trace Window
- Advanced
- Viewpoint Window
- Viewpoint Window Overview
- Watch Window
- Watch Window Overview
- How To - Watch Window
- Technical Notes
- Descriptor Cache: Revealing Hidden Registers
- UEFI Framework Debugging
- Memory Casting
- Microsoft PE Format Support in SourcePoint
- Multi-Clustering
- Python/CScripts
- OpenIPC Integration, Installation and Usage
- Registers Keyword Table
- SourcePoint Licensing
- Stepping
- Symbols Textsym Format
- Target Configuration
- Using Bookmarks
- Which Processor Is Which
- Getting Started with DbC
- SourcePoint Command Language
- Overview
- Commands and Control Variables
- aadump
- abort
- abs
- acos
- advanced
- asin
- asm
- asmmode
- atan
- atan2
- autoconfigure
- base
- bell (beep)
- bits
- break
- breakall
- cachememory
- cause
- Character Functions
- clock
- continue
- cos
- cpubreak commands
- cpuid_eax
- cpuid_ebx
- cpuid_ecx
- cpuid_edx
- createprocess
- cscfg, local_cscfg
- csr
- ctime
- cwd
- dbgbreak commands
- defaultpath
- #define
- define
- definemacro
- deviceconfigure
- devicelist
- devicescan
- disconnect
- displayflag
- do while
- dos
- dport
- drscan
- edit
- editor
- emubreak, emuremove, emudisable, emuenable
- emulatorstate
- encrypt
- error
- eval
- evalprogramsymbol
- execution point ($)
- exit
- exp
- fc
- fclose
- feof
- fgetc
- fgets
- first_jtag_device
- flist
- flush
- fopen
- for
- forward
- fprintf
- fputc
- fputs
- fread
- fseek
- ftell
- fwrite
- getc
- getchar
- getnearestprogramsymbol
- getprogramsymboladdress
- gets
- globalsourcepath
- go
- halt
- help
- homepath
- idcode
- if
- include
- invd
- irscan
- isdebugsymbol
- isem64t
- isprogramsymbol
- isrunning
- issleeping
- issmm
- itpcompatible
- jtagchain
- jtagconfigure
- jtagdeviceadd
- jtagdeviceclear
- jtagdevices
- jtagscan
- jtagtest
- keys
- last
- last_jtag_device
- left
- libcall
- license
- linear
- list, nolist
- load
- loadbreakpoints
- loadlayout
- loadproject
- loadtarget
- loadwatches
- log, nolog
- log10
- loge
- logmessage
- macropath
- Memory Access
- messagebox
- mid
- msgclose
- msgdata
- msgdelete
- msgdr
- msgdump
- msgir
- msgopen
- msgreturndatasize
- msgscan
- msr
- num_activeprocessors
- num_all_devices
- num_devices
- num_jtag_chains
- num_jtag_devices
- num_processors
- num_uncore_devices
- openipc
- pause
- physical
- port
- pow
- print cycles
- printf
- proc
- processorcontrol
- processorfamily
- processormode
- processors
- processortype
- projectpath
- putchar
- puts
- rand
- readsetting
- reconnect
- Register Access
- reload
- reloadproject
- remove
- reset
- restart
- return
- right
- runcontroltype
- safemode
- save
- savebreakpoints
- savelayout
- savewatches
- selectdirectory
- selectfile
- shell
- show
- sin
- sizeof
- sleep
- softbreak, softremove, softdisable, softenable
- sprintf
- sqrt
- srand
- step
- stop
- strcat
- strchr
- strcmp
- strcpy
- _strdate
- string [ ] (index into string)
- strlen
- _strlwr
- strncat
- strncmp
- strncpy
- strpos
- strstr
- _strtime
- strtod
- strtol
- strtoul
- _strupr
- swbreak
- switch
- swremove
- tabs
- tan
- tapdatashift
- tapstateset
- targpower
- targstatus
- taskattach
- taskbreak, taskremove, taskdisable, taskenable
- taskend
- taskgetpid
- taskstart
- tck
- time
- uncoreconfigure
- uncorescan
- #undef
- unload
- unloadproject
- upload
- use
- verify
- verifydeviceconfiguration
- verifyjtagconfiguration
- version
- viewpoint
- vpalias
- wait
- wbinvd
- while
- windowrefresh
- wport
- writesetting
- yield
- yieldflag
Registers Window Introduction
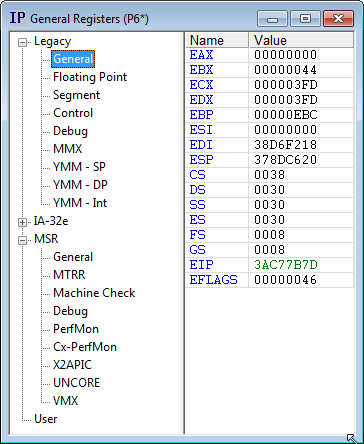
The Registers window displays registers from a selected processor. Multiple Registers windows may be opened.
To open the Registers window, select View|Registers on the menu bar or click on the Registers icon on the toolbar.

Registers window
Register Groups
The left side of the Registers window contains groups of registers that are available for viewing.
Register List
The right side of the Registers window displays the list of processor registers contained in the selected register group. The number of columns displayed varies based on the register group selected. Columns are resizable.
Name. Displays the register name. The tooltip for a register name gives a description of the register.
Value. Displays the register value. Register values are displayed in hexadecimal except for floating point registers which are displayed in scientific notation.
The tooltip for a register value varies depending on the register type. If the register contains sub-fields, then the field names and values are displayed. For instance, the tooltip for EFLAGS displays all the processor flags and their values. The tooltip for floating point registers displays the value in hex. The tooltip for segment registers (CS, SS, etc.) displays the base, limit, and access rights associated with that register
Number. This column is only present when an MSR register group is displayed. It displays the MSR number.
Description. This column is only present when an MSR register group is displayed. It displays a description of the MSR.
Registers Window Menu
The Registers menu displays on the menu bar after a Registers window has been opened. It is also displayed when right-clicking in the Register List area of the Registers window
Edit. Edits a register value. Double left-clicking has the same effect. See Editing a Register Value below.
Expand. Displays a register value in binary. See Expanding a Register Value below.
Remove. Removes the currently selected register from the Register list. The register can be restored by selecting Restore Defaults.
Open Code Window. Opens a Code Window to the address specified by the selected register value.
Open Memory Window. Opens a Memory Window to the address specified by the selected register value.
Peek Memory. Read 32 bits of memory using the register value as a memory address.
Show Description. Shows / hides the Description columns.
Copy to User Page. Copies the currently selected register to the User register list. This is useful for creating a custom register list.
Restore Defaults. Restores the default register lists.
Viewpoint. Selects which processor’s registers are displayed. This menu item is only present for multi-processor targets. See Processor Selection below.
Editing a Register Value
To edit a register value, either select Edit from the menu, or double click on a register value. Enter the new value, and either press Enter, or cursor from the field to write the value to the processor. Press Esc to cancel an edit
If a value is being edited when either go or step is selected, the edit is terminated, the value is written to the processor, and then the go or step operation is performed. Register values cannot be edited while the processor is running
Read-only register values are displayed in gray. These values may not be edited. Write-only register values are displayed as a string of asterisks. To edit a write-only value, type over the asterisks. When the edit is terminated, the value is written to the processor and the register value changes back to asterisks.
Register values can be copied and pasted by using the Edit menu item on the menu bar to copy and paste a value.
Register values may be displayed and edited in binary by opening the Expand window.
Expanding a Register Value
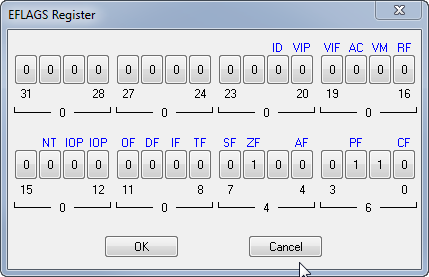
To expand a register to view individual bits, select Expand from the menu. The Expand dialog will open.

Expand dialog
Each bit is displayed as a button with its value displayed in binary. The name of each bit (if any) is displayed above the button. Multi-bit fields have the same name above each button. Bit names are shortened to a maximum of three characters. The flyover help for a bit displays a longer description of that bit.
Bit numbers, along with the value of each nibble in hex, are displayed beneath the buttons.
To change the value of a bit, click on the bit, or cursor to a bit and press 0 or 1. To write the value to the processor, press the OK button.
Note: To display a register's bits and have them remain always viewable, open the Watch window, and drag the register name into it. Click on the "+" sign to the left of the register name to display the register's bits.
Processor Selection
The processor is selected by selecting Viewpoint in the menu, and then specifying a processor. On single processor targets, this menu item is not present.
The default processor selection is Track Viewpoint. When selected, the Registers window automatically switches processors when the viewpoint processor is changed (in the Viewpoint window).
The currently selected processor is displayed in the Title bar. If Track Viewpoint is enabled, then a '*' character is displayed.
Register Value Coloring
Modified registers are colored green. This indicates that the register's value has changed as a result of a go or step operation or that the value has been edited.
Read-only register values are displayed in gray rather than black. Write-only register values are displayed as a string of asterisks rather than numbers.
Register coloring can be customized by selecting Options|Preferences|Colors.

