Table of Contents
- Using Help
- Contacting ASSET InterTech
- Introduction to SourcePoint
- SourcePoint Environment
- SourcePoint Overview
- SourcePoint Parent Window Introduction
- SourcePoint Icon Toolbar
- File Menu
- File Menu - Project Menu Item
- File Menu - Layout Menu Item
- File Menu - Program Menu Item
- File Menu - Macro Menu Item
- File Menu - Print Menu Items
- File Menu - Update Emulator Flash Menu Item
- File Menu - Program Target Device Menu Item
- File Menu - Other Menu Items
- Edit Menu
- View Menu
- Processor Menu
- Options Menu
- Options Menu - Preferences Menu Item
- Options Menu - Target Configuration Menu Item
- Options Menu - Load Target Configuration File Menu Item
- Options Menu - Save Target Configuration File Menu Item
- Options Menu - Emulator Configuration Menu Item
- Options Menu - Emulator Connection Menu Item
- Options Menu - Emulator Reset Menu Item
- Options Menu - Confidence Tests Menu Item
- Window Menu
- Help Menu
- How To -- SourcePoint Environment
- Add Emulator Connections
- Configure Custom Macro Icons
- Configure Autoloading Macros
- Display Text on the Icon Toolbar
- Edit Icon Groups to Customize Your Toolbars
- Modify a Defined Memory Region
- Refresh SourcePoint Windows
- Save a Program
- Start SourcePoint With Command Line Arguments
- Use the New Project Wizard
- Verify Emulator Network Connections
- SourcePoint Overview
- Breakpoints Window
- Breakpoints Window Overview
- How To - Breakpoints
- Code Window
- Command Window
- Command Window Overview
- Confidence Tests Window
- Confidence Tests Window Overview
- Descriptors Tables Window
- Descriptors Tables Window Overview
- How To - Descriptors
- Devices Window
- Devices Window Overview
- How To - Devices Window
- Log Window
- Log Window Overview
- Memory Window
- Memory Window Overview
- How To - Memory Window
- Page Translation Window
- Page Translation Windows Overview
- PCI Devices Window
- PCI Devices Window Overview
- How To - PCI Devices Window
- Registers Window
- Registers Window Overview
- How To - Registers
- Symbols Windows
- Symbols Window Overview
- How To - Symbols Window
- Viewpoint Window
- Viewpoint Window Overview
- Watch Window
- Watch Window Overview
- How To - Watch Window
- Technical Notes
- SourcePoint Command Language
- Overview
- Commands and Control Variables
- aadump
- abort
- abs
- acos
- advanced
- asin
- asm
- asmmode
- atan
- atan2
- autoconfigure
- base
- bell (beep)
- bits
- break
- breakall
- cachememory
- cause
- Character Functions
- clock
- continue
- cos
- cpubreak commands
- cpuid_eax
- cpuid_ebx
- cpuid_ecx
- cpuid_edx
- createprocess
- ctime
- cwd
- dbgbreak commands
- defaultpath
- #define
- define
- definemacro
- deviceconfigure
- devicescan
- disconnect
- displayflag
- do while
- dos
- dport
- drscan
- edit
- editor
- emulatorstate
- encrypt
- error
- eval
- evalprogramsymbol
- execution point ($)
- exit
- exp
- fc
- fclose
- feof
- fgetc
- fgets
- first_jtag_device
- flist
- flush
- fopen
- for
- forward
- fprintf
- fputc
- fputs
- fread
- fseek
- ftell
- fwrite
- getc
- getchar
- getnearestprogramsymbol
- getprogramsymboladdress
- gets
- globalsourcepath
- go
- halt
- help
- homepath
- idcode
- if
- include
- invd
- irscan
- isdebugsymbol
- isem64t
- isprogramsymbol
- isrunning
- issleeping
- issmm
- jtagchain
- jtagconfigure
- jtagdeviceadd
- jtagdeviceclear
- jtagdevices
- jtagscan
- jtagtest
- keys
- last
- last_jtag_device
- left
- license
- linear
- list, nolist
- load
- loadbreakpoints
- loadlayout
- loadproject
- loadtarget
- loadwatches
- log, nolog
- log10
- loge
- logmessage
- macropath
- Memory Access
- messagebox
- mid
- msgclose
- msgdata
- msgdelete
- msgdr
- msgdump
- msgir
- msgopen
- msgreturndatasize
- msgscan
- msr
- num_activeprocessors
- num_all_devices
- num_devices
- num_jtag_chains
- num_jtag_devices
- num_processors
- pause
- physical
- port
- pow
- print cycles
- printf
- proc
- processorcontrol
- processorfamily
- processormode
- processors
- processortype
- projectpath
- putchar
- puts
- rand
- readsetting
- reconnect
- Register Access
- reload
- reloadproject
- remove
- reset
- restart
- return
- right
- runcontroltype
- safemode
- save
- savebreakpoints
- savelayout
- savewatches
- selectdirectory
- selectfile
- shell
- show
- sin
- sizeof
- sleep
- softbreak, softremove, softdisable, softenable
- sprintf
- sqrt
- srand
- step
- stop
- strcat
- strchr
- strcmp
- strcpy
- _strdate
- string [ ] (index into string)
- strlen
- _strlwr
- strncat
- strncmp
- strncpy
- strpos
- strstr
- _strtime
- strtod
- strtol
- strtoul
- _strupr
- swbreak
- switch
- swremove
- tabs
- tan
- tapdatashift
- tapstateset
- targpower
- targstatus
- taskattach
- taskbreak, taskremove, taskdisable, taskenable
- taskend
- taskgetpid
- taskstart
- tck
- time
- #undef
- unload
- unloadproject
- upload
- unlock
- use
- verify
- verifydeviceconfiguration
- verifyjtagconfiguration
- version
- viewpoint
- vpalias
- wait
- wbinvd
- while
- windowrefresh
- wport
- writesetting
- yield
- yieldflag
How to Add Emulator Connections
Once you have successfully established the first communication connection between the emulator and host system (as described in the Getting Started guide that shipped with your unit), you can add emulator connections at any time. Two basic types of connections are described below: USB and TCP/IP.
USB Connections
If you are adding a USB connection (assuming you currently have a TCP/IP connection):
-
Attach the USB cable. (This can be hot plugged; you do not need to disconnect your TCP/IP cable.) A standard Microsoft® Windows® hardware installation wizard appear asking you to install the USB driver.
-
Click on the Browse button in this dialog box and browse to your SourcePoint working directory.
-
Click on ”AriumUsb.inf”
-
Complete the Microsoft installation wizard.
-
Select Options|Emulator Connection from the toolbar menu. The Emulator Connection dialog box appears, and the USB connection automatically displays in the connection list.
-
Select the USB connection from the list.
-
Click on the button labeled Select As Current Connection or double click the connection.
-
Click the OK button.
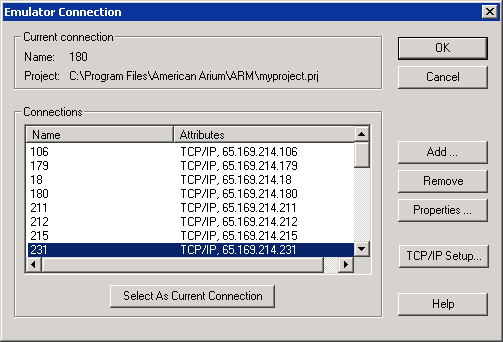
Emulator Connection dialog box
-
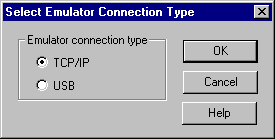
Click the Add button. The Select Emulator Connection Type dialog box appears.
Select Emulator Connection Type dialog box
-
Enable USB.
-
Click the OK button. The Emulator USB Connection Properties dialog box opens with all the text fields filled in.
-
Click the OK button. The dialog box closes, and the Emulator Connection dialog box displays again.
-
Double click the now highlighted connection entry in the Connections text box or click on the Select as Current Connection button and then the OK button.
The name of the current connection is displayed at the top of the Emulator Connection dialog box under Current Connection section.
TCP/IP Connections
If you are adding a TCP/IP connection:
-
If necessary, change the hardware cable. A non-network direct connection requires the orange cable. A network connection requires the blue cable.
For a direct (non-network) connection between host computer and emulator, a crossover cable is required. (An orange crossover cable is included with new emulators). To connect the emulator to a network, a direct cable is required. (A blue direct cable is included with new emulators.)
-
Go to Options|Emulator Connection on the menu bar. The Emulator Connection dialog box opens with at least one IP address in the Connections section.
Emulator Connection dialog box
-
Press the Add button. The Select Emulator Connection Type dialog box displays.
-
Select TCP/IP.
Select Emulator Connection Type dialog box with TCP/IP selected
-
Click the OK button. The Emulator TCP/IP Connection Properties dialog box opens.
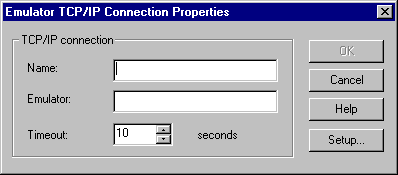
Emulator TCP/IP Connection Properties dialog box
-
Fill in the blanks.
-
Name. The Name text box is a required entry. Create a name that helps you recognize the emulator.
-
Emulator. The Emulator text box specifies the emulator IP address.
-
-
For direct IP connections, use IP address 192.168.000.001
-
For network IP connections, use the address given to you by your Network Administrator.
-
-
Timeout. The Timeout control specifies the number of seconds to add to SourcePoint's internal communication timeout value for this emulator connection. The default value is 10 seconds.
-
Click the OK button. The Emulator Connection dialog box redisplays with the new emulator connection information highlighted.
-
Double-click the highlighted entry or click on Select As Current Connection button and then the OK button. The name of the current connection is displayed at the top of the Emulator Connection dialog box in the Current Connection section.
Using Microsoft Windows 2000/2003/2008 DDNS for Addressing Emulators by Hostname
If your network includes a Microsoft Windows 2000/2003/2008 server that provides DHCP and DDNS services, you can configure your emulator to request a dynamic IP address from the server (DHCP) and then configure SourcePoint to address the emulator by name (e.g., serial number) instead of by IP address.
Note: This procedure works only if the DDNS and DHCP services on your Microsoft Windows 2000/003/2008 Server are configured appropriately.
To add a dynamic TCP/IP connection by using a hostname:
-
Make sure that the emulator is connected to the network with a direct cable (not a crossover cable). A blue direct cable is included with every new emulator.
-
Go to Options|Emulator Connection on the menu bar. The Emulator Connection dialog box displays.
Emulator Connection dialog box
-
Press the Add button. The Select Emulator Connection Type dialog box displays.
-
Select TCP/IP.
Select Emulator Connection Type dialog box with TCP/IP selected
- Click the OK button. The Emulator TCP/IP Connection Properties dialog box displays.
Emulator TCP/IP Connection Properties dialog box
-
Fill in the blanks.
-
Name. The Name text box is a required entry. Create a name that helps you recognize the emulator.
-
Emulator. In this configuration, the Emulator text box specifies the name of the emulator as it is registered in the DDNS service. This is in the format ecm-<serial number> (e.g., ecm-5123).
Depending on your network configuration, you may need either to register a DNS suffix on the workstation where SourcePoint is installed (see "Registering a DNS Suffix" below), or specify the emulator name as a Fully Qualified Domain Name (FQDN), e.g., ecm-5123.abc.net. See your Network Administrator for more information.
-
If using a standard hostname, type ”ecm-<serial number>”. without quotation marks and inserting the actual serial number of the emulator in place of the italicized words shown (i.e., ecm-5123).
-
Timeout. The Timeout control specifies the number of seconds to add to SourcePoint's internal communication timeout value for this emulator connection. The default value is 10 seconds.
-
Click the OK button. The Emulator Connection dialog box redisplays. The new emulator connection information is highlighted.
-
Double-click the highlighted entry or click on Select As Current Connection button and then the OK button.
The name of the current connection is displayed at the top of the Emulator Connection dialog box under Current Connection.
Registering a DNS Suffix
If you want to set up an emulator TCP/IP connection based on DNS name instead of IP address, you may need to set up a DNS suffix on the workstation where SourcePoint is installed.
-
Get the DNS suffix from your Systems Administrator.
-
Go to your Control Panel and double click on Network and Dial-up Connections.
-
Double click on Local Area Connections. The Local Area Connections Status dialog box displays.
-
On the General tab, click the Properties button. The Local Area Connection Properties dialog box displays.
-
In the This connection uses the following items field, double-click on the Internet Protocol (TCP/IP) option.
-
Click the Properties button. The Internet Protocol (TCP/IP) Properties dialog box displays.
-
Click the Advanced button. The Advanced TCP/IP Settings dialog box displays.
-
Click on the DNS tab.
-
Do one of the following:
-
To resolve an unqualified name by appending the primary DNS suffix and the DNS suffix of each connection (if configured), enable Append primary and connection specific DNS suffixes. If you also want to search the parent suffixes of the primary DNS suffix up to the second-level domain, enable Append parent suffixes of the primary DNS suffix.
-
To resolve an unqualified name by appending the suffixes from the list of configured suffixes, enable Append these DNS suffixes (in order), and then click the Add button to add suffixes to the list.
-
To configure a connection-specific DNS suffix, key in the DNS suffix in the DNS suffix for this connection text box.
-
Click the OK button.
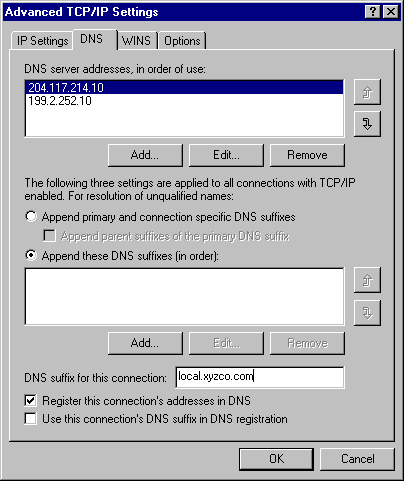
Advanced TCP/IP Settings dialog box showing the DNS tab
-
In the DNS suffix for this connection text box, type the domain suffix supplied by your Systems Administrator.
-
Click the OK button.