
I haven’t blogged for a while, as I’ve been working on finding a good replacement for the now-scarce AAEON Tiger Lake board; but in my spare fun time I’ve been retracing my steps through Satoshi Tanda’s Hypervisor course.
As you may know, late last year we launched a new version of SourcePoint Intel for hobbyists and institutional researchers: https://www.asset-intertech.com/resources/blog/2021/12/new-lower-cost-versions-of-sourcepoint-for-hobbyists-and-researchers/. This new offering, starting at the low price of $365/year, is intended to help makers and researchers learn the intrinsics of x86 architecture and firmware at the lowest level that is offered only by JTAG. Access to run-control and trace features, and coupled with our robust source-level GUI and command language, it’s a powerful tool that has previously only been available to large companies with deep pockets. For the first time in history, access to such incredible technology is now within the financial reach of average researchers and hobbyists of more modest means.
More purchasing information on the program is available here: https://www.asset-intertech.com/products/sourcepoint/sourcepoint-intel/limited-time-offer/.
The success of this program is predicated upon two things: (1) the use of the Intel Direct Connect Interface (DCI) to connect the SourcePoint application to the Intel target, and (2) the availability of a reasonably low-cost x86 target that supports the necessary DCI enabling features. (1) eliminates the need for an expensive hardware probe (in ASSET’s case, the ECM-XDP3e), replacing it with just a $10 – $20 USD specialty USB cable, and (2) uses the AAEON UP Xtreme i11 i3/i5/i7 board, which though in the $500 USD range, might be reasonably affordable for those with a passion to learn and funds to procure it.
At first, the commercial program was a great success; many engineers and researchers took advantage of the limited time offer to procure the software and the needed hardware, and began their work. But, we ran into a snag: AAEON encountered supply chain issues with some of the components needed to build the board. So, now, instead of a 1-2 week delivery, lead times are now pushed out to 20+ weeks.
To address this issue, AAEON is redesigning the board, to eliminate the long-lead-time items. But, it’s still not clear exactly when this will be complete, and if the necessary hardware design, firmware straps, and BIOS settings will be enabled to support DCI in this new board. This is what you see on their website now, when you go to purchase the new revision of the board:
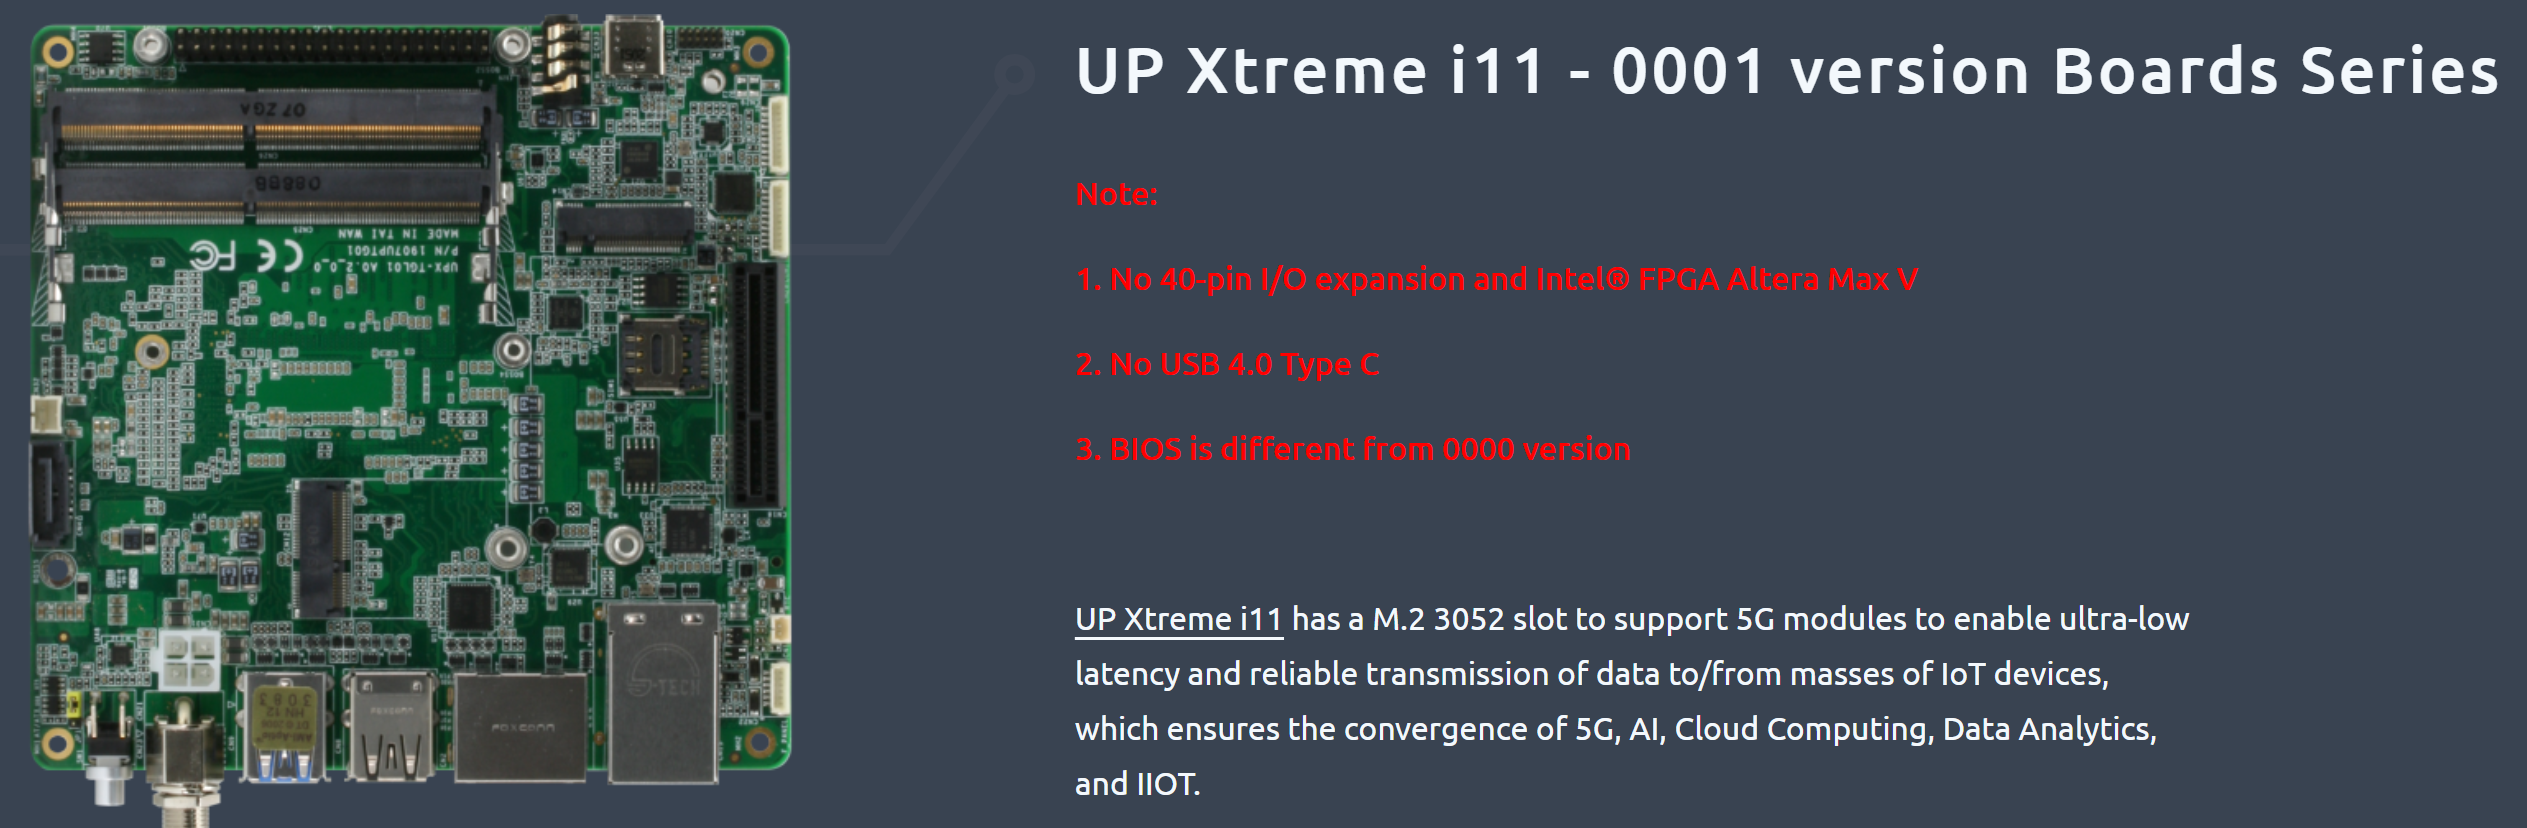
Only time will tell if the new board is suitable for DCI debug. I really hope that they succeed; AAEON platforms that I’ve worked with in the past, including the UP Squared, UP Xtreme, and UP Xtreme i11, are great maker boards, and are a good fit for JTAG debug with our products.
So, we’re continuing to run our hobbyist license promotion, for those who might have squeezed in a purchase of the UP Xtreme i11 before AAEON ran out.
In the meantime, we’re looking at the AAEON UP Xtreme board (note the missing “i11” – don’t you love marketing people), the UP Xtreme i11’s predecessor, as an alternative.
The UP Xtreme board has a Whiskey Lake processor, versus the Tiger Lake that is in the UP Xtreme i11. For most intents and purposes, though, both platforms are identical from a debug perspective. The one wrinkle is that the Whiskey Lake board has an earlier version of DCI, dubbed DbC3 (versus the DbC2 that’s in the Tiger Lake board – I know that it sounds like DbC3 should be more modern than DbC2, but it’s actually the other way around). So, it takes a little more work to have run-control work satisfactorily. Stay tuned for an update.
And now for a change of subject. I still have my UP Xtreme i11, and am itching for some spare time to work with it in conjunction with everything I learned in Satoshi Tanda and Bruce Dang’s Hypervisor Development course I took last year. I put the material down, and hadn’t used it as much as I would like, so needed some refresher time. It’s really a great course; I note that Satoshi taught a more “offensive” version of it at the OffensiveCon Berlin conference last week: https://www.offensivecon.org/trainings/2022/hypervisor-development-for-security-analysis.html.
I’m going to take a short walk through the initial steps needed to get started with the course, and in that way hopefully help anyone new to this subject get a sense of what’s required, and what you can expect to learn. By itself, this walkthrough isn’t enough to master the material; you really need to take the course in order to learn it. As Satoshi quotes Benjamin Franklin at the beginning: “Tell me and I forget, teach me and I may remember, involve me and I learn”.
In addition to the basic learning presentation material, this course is “Hands-On” in that you build a simple UEFI-based Type 1 hypervisor “from scratch”, and gradually add to it to handle more and more features (like Extended Page Tables, Multi-processor Support, Control Register Shadowing, etc.) until you cover a lot of cases that a Type 1 passthrough hypervisor would encounter for Linux and Windows boots. I say “from scratch” for a couple of reasons: firstly, Satoshi has done a lot of the heavy lifting to create the “simple” hypervisor for you, and secondly you need to do a few days’ work before the course starts to configure the build environment so you can hit the ground running.
So let’s look at that preparatory work: for my build environment, I elected to use Windows Subsystem for Linux (WSL 1) as opposed to Ubuntu. I suspect that this added some complexity, but it also added to the learning experience. It’s your choice which to use; both work fine.
If you’re building with Windows as your host machine, there are a few things to take care of beforehand:
You have to turn off the following settings:
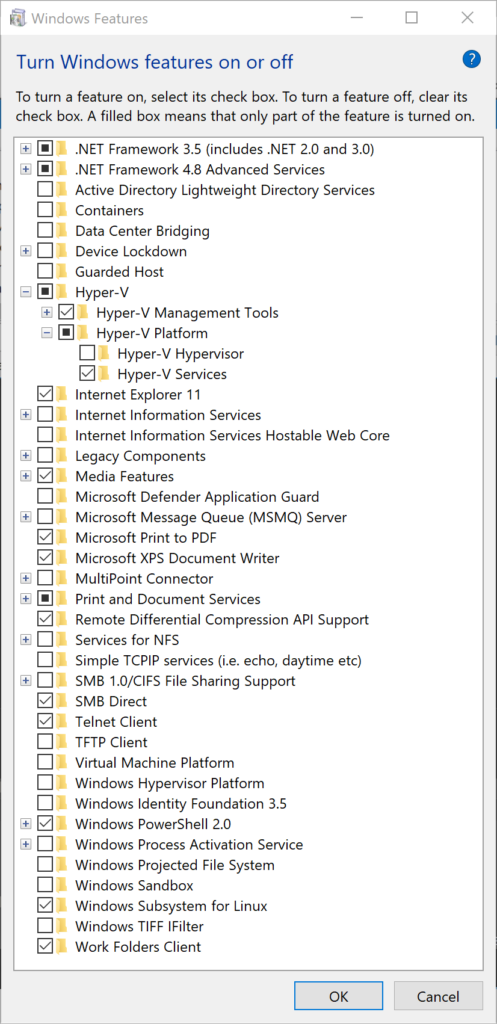
    - Settings > Windows Security > Device security > Core isolation > Memory integrity

    - Control Panel > Programs > Turn Windows features on or off:

        - Hyper-V > Hyper-V Platform > Hyper-V Hypervisor

        - Windows Defender Application Guard

        - Virtual Machine Platform

        - Windows Hypervisor Platform
Your screen should look something like this:
And then from an elevated CMD prompt, type in:
> bcdedit /set hypervisorlaunchtype off
With REGEDIT, set:
HKEY_LOCAL_MACHINE\SYSTEM\CurrentControlSet\Control\DeviceGuard

- EnableVirtualizationBasedSecurity = 0

HKEY_LOCAL_MACHINE\SYSTEM\CurrentControlSet\Control\DeviceGuard\Scenarios\CredentialGuard

- Enabled = 0

HKEY_LOCAL_MACHINE\SYSTEM\CurrentControlSet\Control\DeviceGuard\Scenarios\HypervisorEnforcedCodeIntegrity

- Enabled = 0

 HKEY_LOCAL_MACHINE\SYSTEM\CurrentControlSet\Control\DeviceGuard\Scenarios\SystemGuard

- Enabled = 0
Interestingly, depending on your current settings, some of these may not be visible; your mileage will vary. Also, you may need to reboot your PC after these steps are completed.
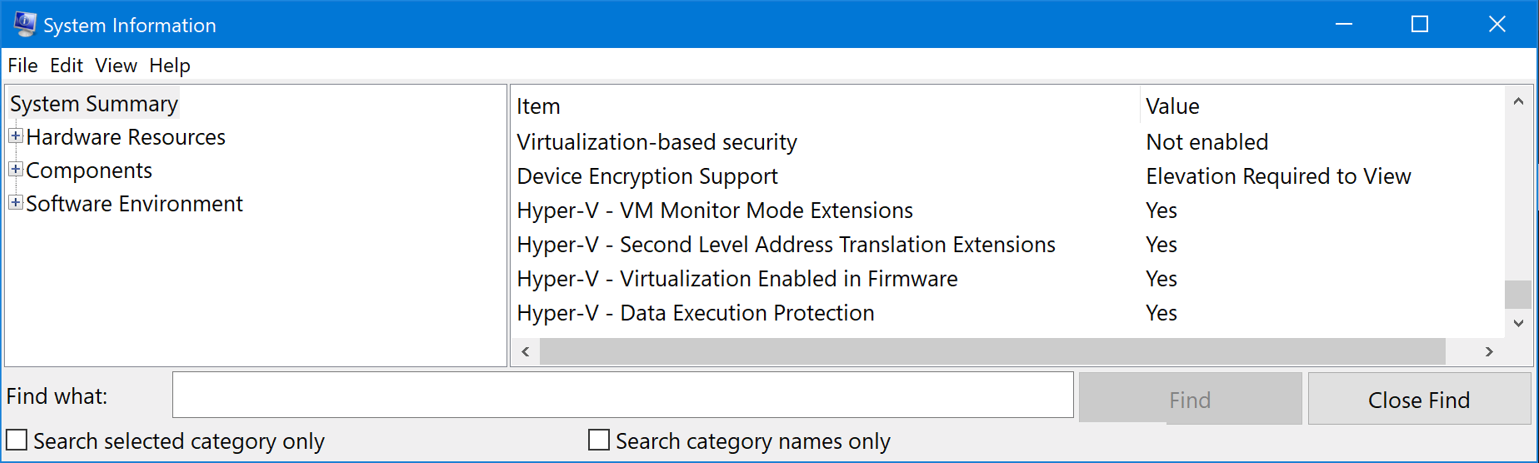
To verify that the above all worked, Hyper-V is fully disabled when msinfo32.exe shows the below:
Now, you have to install WSL 1. Note that this should be WSL 1, not WSL 2. Although I haven’t tried it, I have been told that the latter will not work. There are a lot of articles online that teach you how to do this, and to go back to WSL 1 if you already have WSL 2 installed (like I did).
You’ll want to install the requirements for EDK2 and the class:
$ sudo apt update

$ sudo apt upgrade

$ sudo apt install build-essential uuid-dev iasl git gcc nasm python3-distutils

$ sudo apt install mtools genisoimage
Finally, we’ll be using open source TianoCore for our build, so download the EDK2 environment:
$ sudo apt install git

$ git clone -b edk2-stable202105 --recurse-submodules https://github.com/tianocore/edk2
Satoshi provides his hypervisor package, inclusive of the needed driver ‘C’ and header files, to class attendees. Note that these are not the same as what are in the public domain, as at https://github.com/tandasat/MiniVisorPkg, I don’t think. I haven’t tried it, but I’m sure that it would be a learning experience to do so. In a nutshell, his HvClassPkg folder, inclusive of all needed build files, is copied into the EDK2 folder downloaded from the TianoCore edk2 repository.
Finally, you have to install Visual Studio Code on Windows, and also install the “Remote – WSL extension” from https://marketplace.visualstudio.com/items?itemName=ms-vscode-remote.remote-wsl. Then, it’s a simple matter of invoking the build via this command from WSL 1:
$ code hvclass/edk2/HvClassPkg/HvClassPkg.code-workspace
The resulting build runs for a few minutes. When complete, it looks like this:
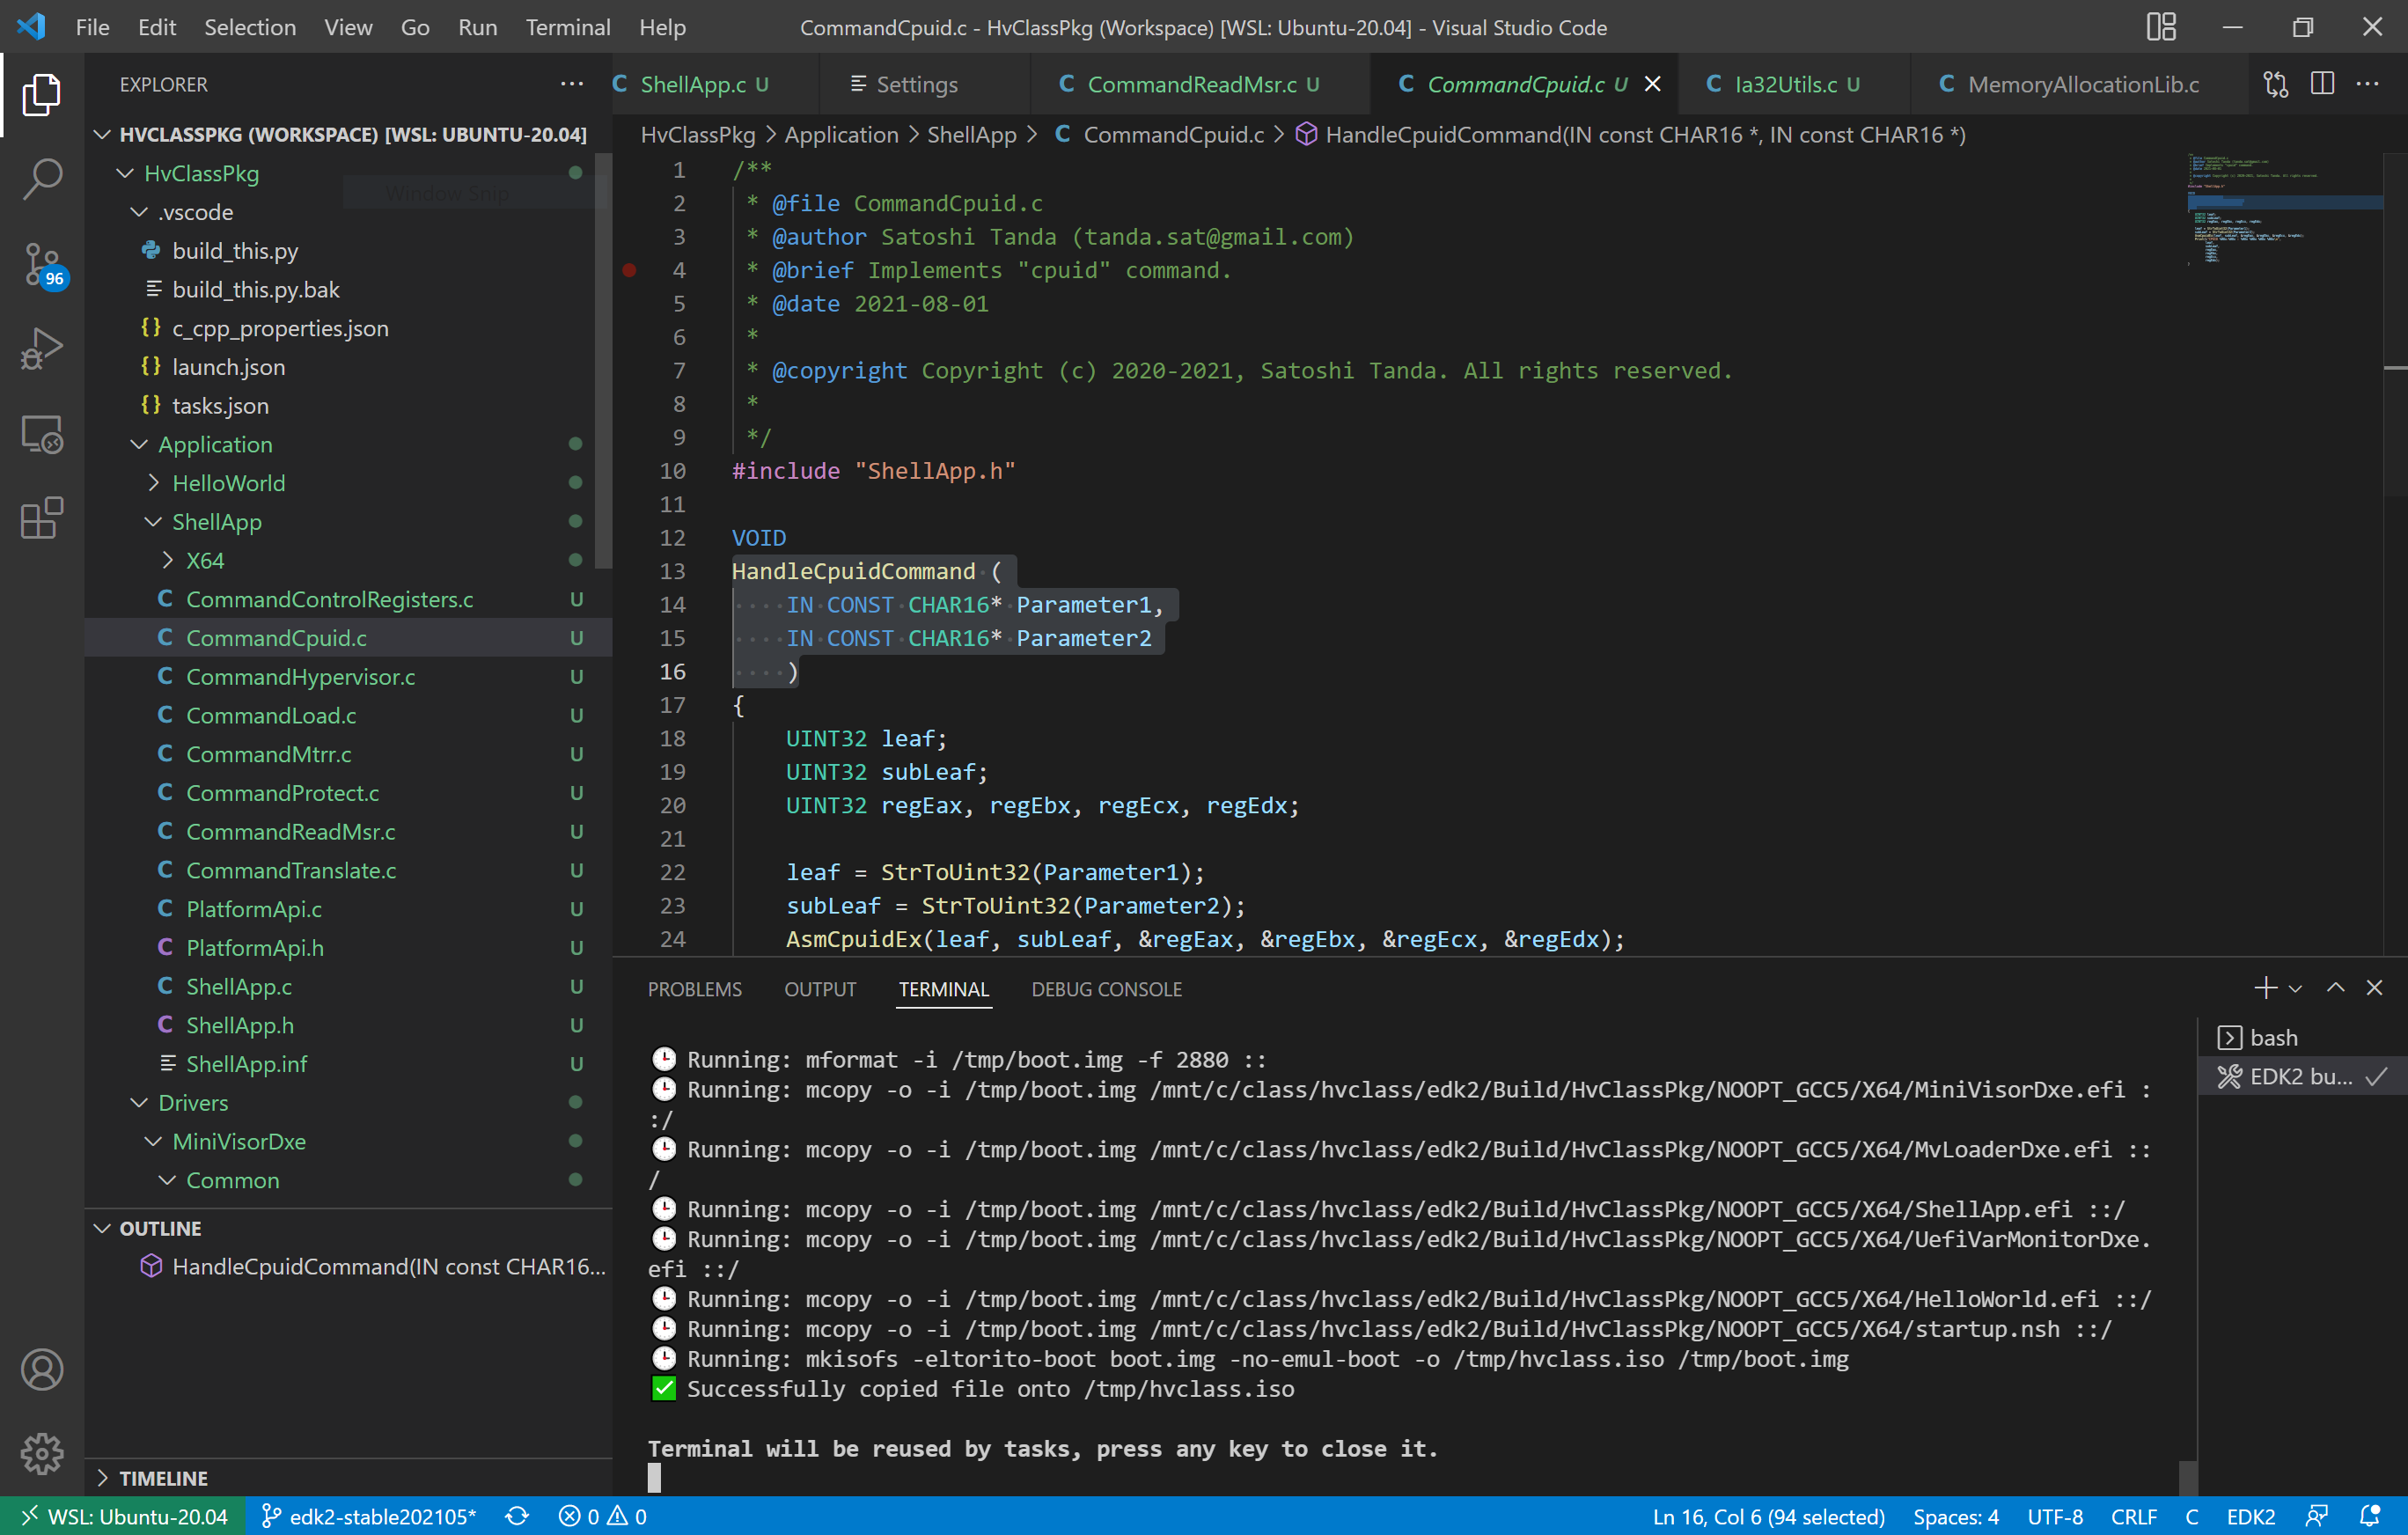
The ShellApp.efi and MiniVisorDxe.efi are two modules that can be used directly from the UEFI shell as a demo vehicle for the hypervisor. You can see this in action here: Debugging Type 1 Hypervisors on the UP Xtreme i11 using JTAG/DCI.
Note also that build results in a file named hvclass.iso. This is used to install the hypervisor shim to later set up a Windows 10 or Linux VM within VMware Workstation 16 Player. We have all the files needed to run the hypervisor on real hardware, as a further exercise. It’s this latter that I’ll write about in my next article – to run this on actual Tiger Lake or Whiskey Lake hardware, and debug it with SourcePoint. This is going to be fun!