
In Episode 1 of the UP Squared Chronicles, I used my DediProg SF100 to flash a debug image equipped with source and symbols onto the UP Squared board. This week, I describe the build process.
As you might recall from Episode 1, the UP Squared board seems to ship with Intel Direct Connect Interface (DCI) enabled, but I could not get it to work. After some research, I determined that although the BIOS menu entry said that DCI was enabled (via the HDCIEN flag), it really was not:
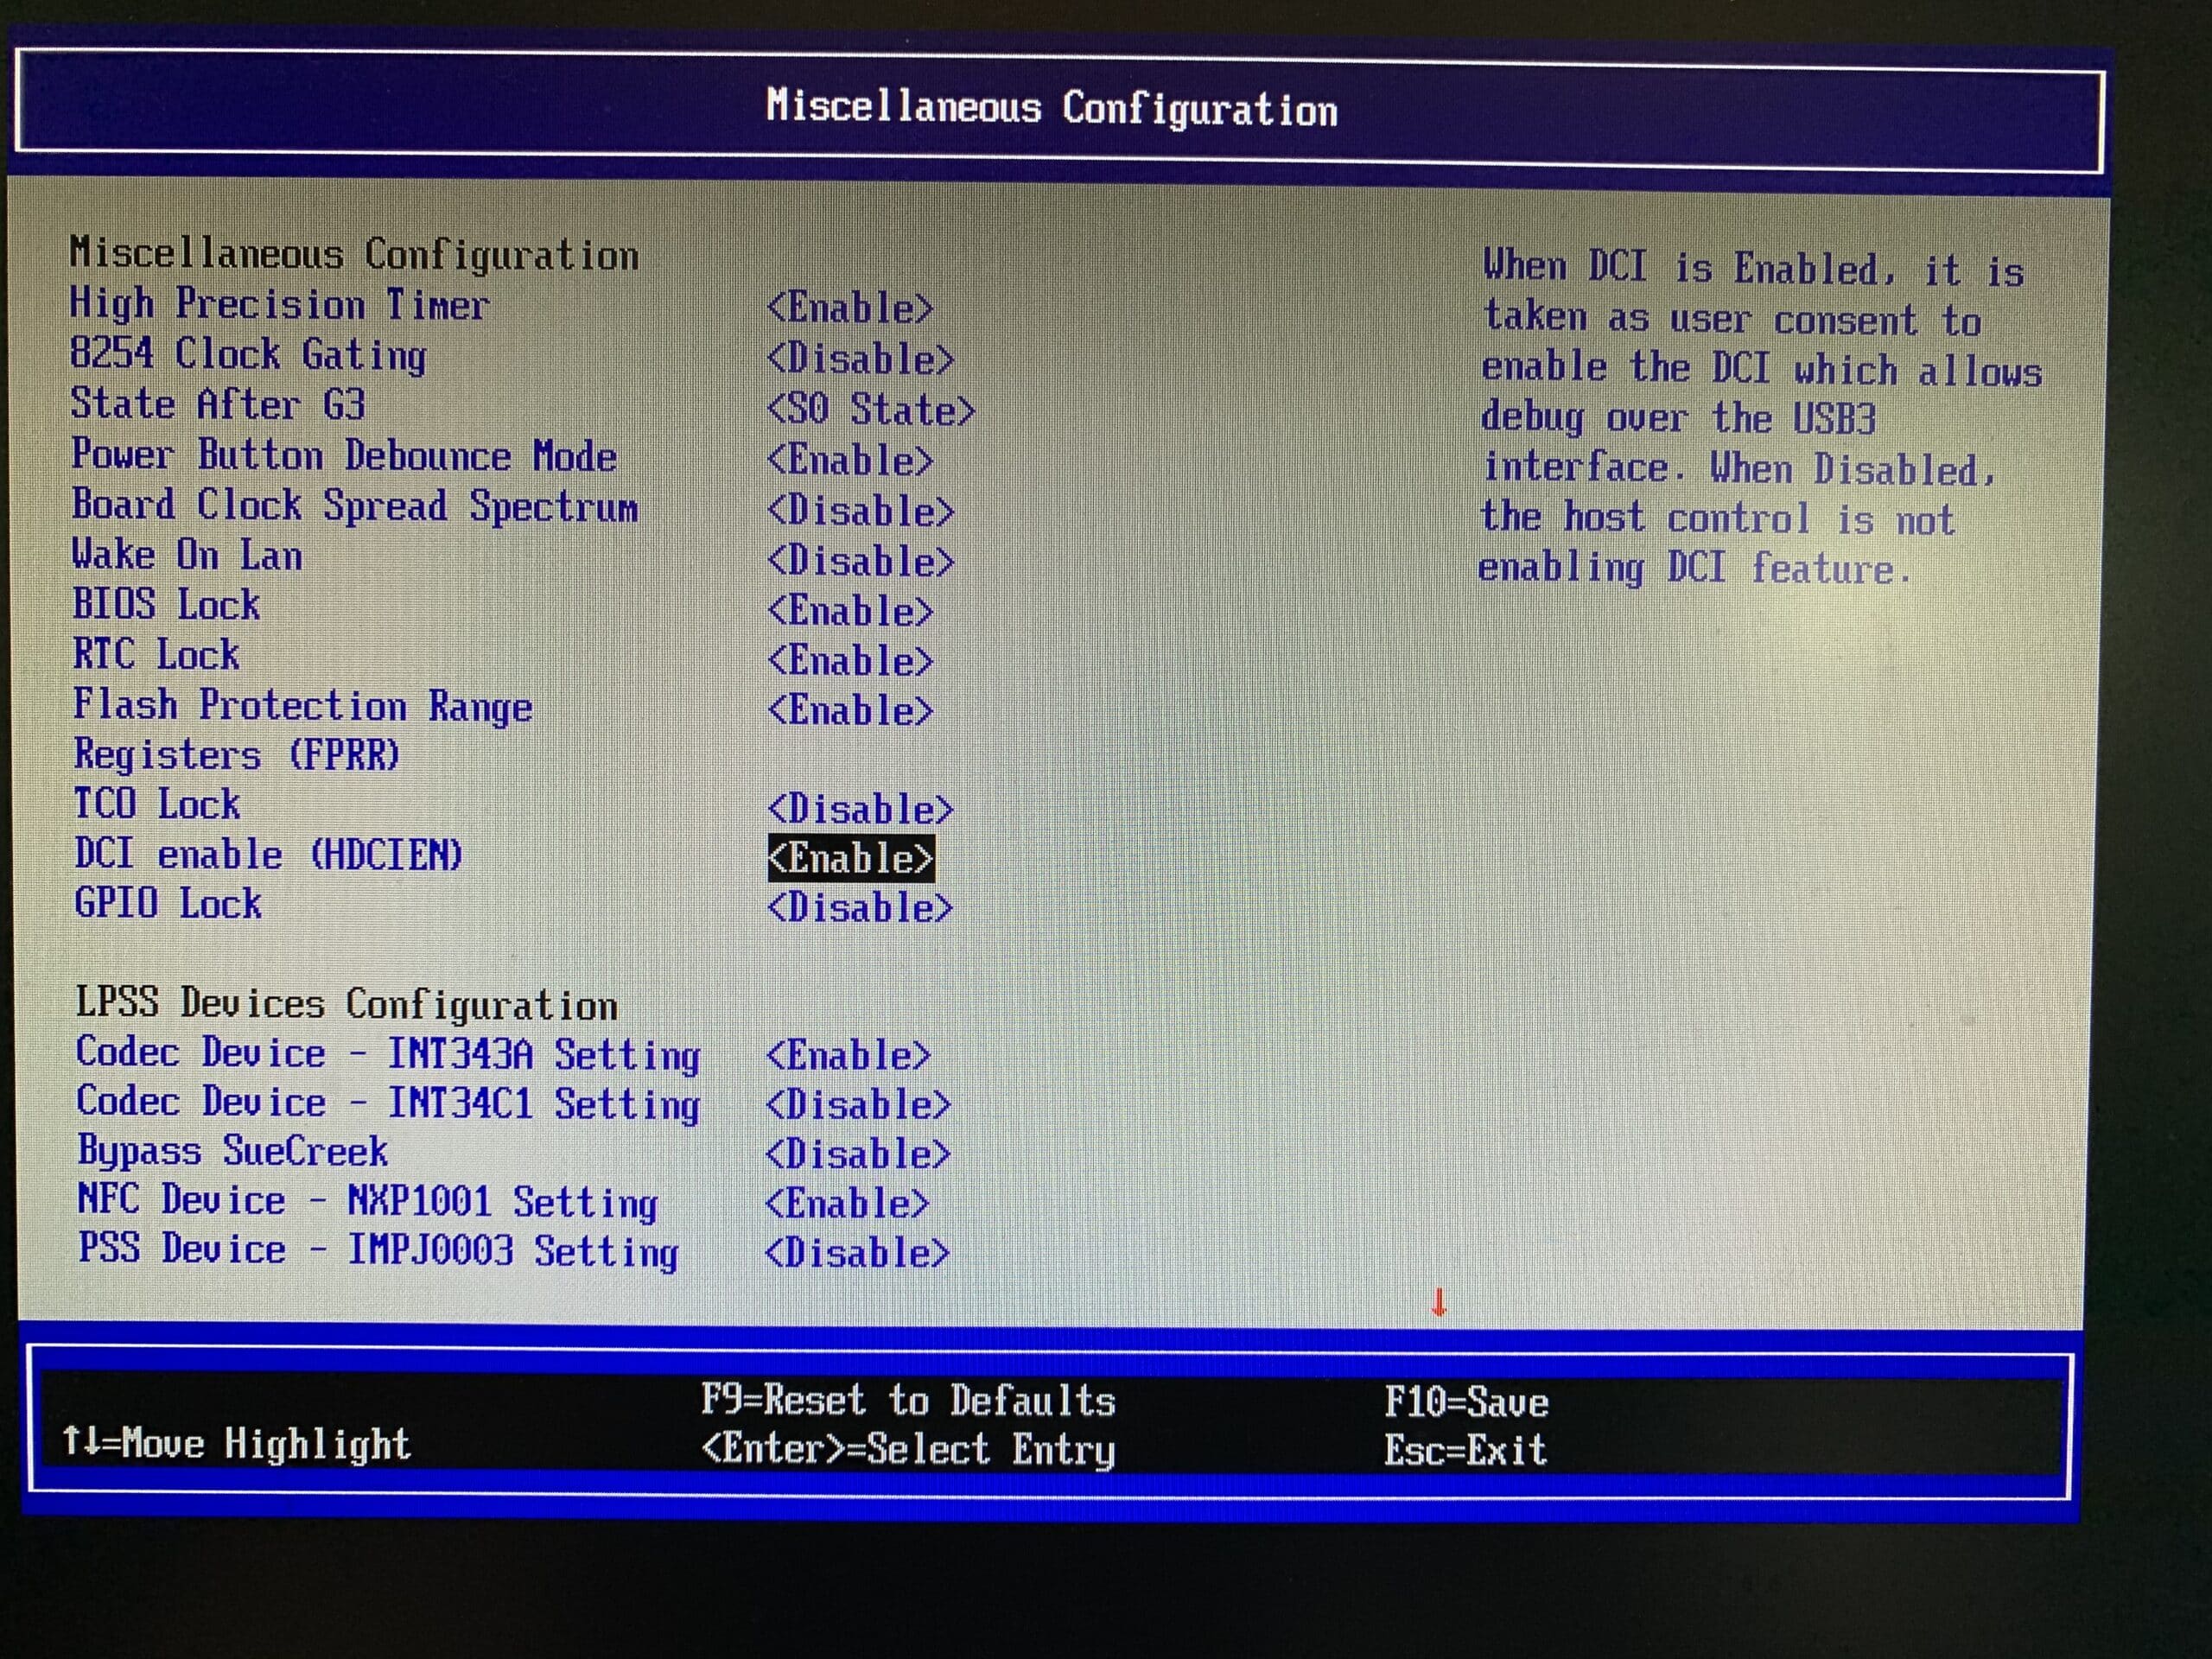
You can see this menu entry by going to:
Device Manager > System Setup > South Cluster Configuration > Miscellaneous Configuration
It was only when I flashed the board with v0.71 of the firmware from the Intel site that I achieved an image that had DCI truly enabled, and it was turned on by default. But it’s not just a matter of just downloading the v0.71 debug firmware and flashing the board. I wanted to do an image build from source so I could use SourcePoint to do source-level debugging, because the debug image has pointers to the original build path within it, and you use SourcePoint to proxy the source code original build path to what’s on your computer.
And doing the build is a little tricky. Intel provides directions to doing the build, but they are dated; current EDK II for the board is no longer supported, which is a bit of a shame; but I still can use the UP Squared to learn more about UEFI and take on some more ambitious projects that the MinnowBoard didn’t have the horsepower for.
Here are the pre-requisites and steps I followed to successfully do the build:
Create a new folder C:\UP2
Run the Developer Command Prompt for VS2015, and then execute the following commands:
C:\Program Files (x86)\Microsoft Visual Studio 14.0> cd /
C:\> cd C:\UP2
C:\UP2> git clone https://github.com/tianocore/edk2-platforms.git -b devel-IntelAtomProcessorE3900
C:\UP2> cd edk2-platforms
C:\UP2\edk2-plaforms> git checkout 2c15135d5d766b276bc1a6d41385230d4aeeb7ea
C:\UP2\edk2-platforms> cd ..
C:\UP2> git clone –recursive -b vUDK2018 https://github.com/tianocore/edk2.git
C:\UP2> cd edk2
C:\UP2\edk2> cd CryptoPkg
C:\UP2\edk2\CryptoPkg> git pull –recurse-submodules && \
C:\UP2\edk2\CryptoPkg> git submodule update –recursive –remote
C:\UP2\edk2\CryptoPkg> cd ..
C:\UP2\edk2> cd ..
C:\UP2> cd edk2-platforms
C:\UP2\edk2-platforms> git clone https://github.com/IntelFsp/FSP.git
C:\UP2\edk2-platforms> cd FSP
C:\UP2\edk2-platforms> git checkout 667eb3edc5d5cd562c33d9fbe89b9bee6a8a80ae
Copy the ApolloLakeFspBinPkg to the folder “C:\UP2\edk2-platforms\Silicon\BroxtonSoC\BroxtonFspPkg”.
And here is the tricky part: installing the UEFI UNDI driver for the Intel i210 Ethernet controller on the UP Squared. The build instructions direct you to download PREBOOT.EXE Version 21.1 from this page: https://downloadcenter.intel.com/download/19186/Intel-Ethernet-Connections-Boot-Utility-Preboot-Images-and-EFI-Drivers, and then copy the UEFI x64 PCI-E gigabit driver (C:\Intel21.1\APPS\EFI\EFIx64\E7320X3.EFI) to the platform package directory below, creating the folder if it does not exist:
“C:\MyWorkspace\edk2-platforms\Platform\BroxtonPlatformPkg\Common\Binaries\UNDI\I210PcieUndiDxe”.
But, the Version 21.1 does not exist on the Intel site! It’s been deprecated. They only go so far back as 22.10, and you can’t find the E7320X3.EFI in any of the other releases. And you can’t complete the build without it.
I probably could have figured this out on my own given enough time, but instead a good friend sent me the file. You can find it here: Download E7320X3. Note: I make no warranties as to the veracity or safety of this driver. Use at your own risk! It has worked for me, and I’ve seen no issues, but consider it as it is: received from a third party, and not part of a trust chain.
After copying the I210 Ethernet controller driver, it’s time to copy the AX88179 USB-to-LAN driver into the same place:
- Download AX88179_178A_UEFI_V2.8.0.zip from http://www.asix.com.tw/FrootAttach/driver/AX88179_178A_UEFI_V2.8.0.zip.
- Unzip AX88179_178A_UEFI_V2.8.0.zip to get AX88179_178A_UEFI_V2.8.0_X64.efi and AX88179_178A_UEFI_V2.8.0_IA32.efi.
- Copy AX88179_178A_UEFI_V2.8.0_X64.efi and AX88179_178A_UEFI_V2.8.0_IA32.efi to below directory, creating the folder if it does not exist:
“C:\MyWorkspace\edk2-platforms\Platform\BroxtonPlatformPkg\Common\Binaries\UNDI\AX88179\”.
At this juncture, the build instructions tell you to install OpenSSL, and supposedly that has been taken care of above through the use of the “recursive” git clone/submodule update above, but it doesn’t really work. I found that only way to get the correct contents is to go directly to https://www.openssl.org/source/old/1.1.0/ and download the openssl-1.1.0g.tar.gz myself. Unzip the entire contents and put it into C:\UP2\edk2\CryptoPkg\Library\OpensslLib\openssl.
The last part of building the full source tree requires fetching the binary blobs. Download the “IntelAtomE3900-0.71-Binary.Objects.zip” from the project page, then unzip and copy them into “C:\MyWorkspace\edk2-platforms\Platform\BroxtonPlatformPkg\Board\”, creating the folder if it does not exist.
Now you’re ready to do the build, after you’ve set up the build environment itself. For completeness:
- Install version Python* 2.7.10 from: https://www.python.org/downloads/release/python-2710/.
- Install the NASM* assembly language compiler:
- a) Download NASM* 2.12.02 binaries:
http://www.nasm.us/pub/nasm/releasebuilds/2.12.02/win32/nasm-2.12.02-win32.zip
http://www.nasm.us/pub/nasm/releasebuilds/2.12.02/win64/nasm-2.12.02-win64.zip
- b) Unzip the 32-bit & 64-bit versions of nasm.exe to the directories listed below respectively, and create the folders if they do not exist:
“C:\MyWorkspace\edk2-platforms\Platform\BroxtonPlatformPkg\Common\Tools\nasm\Win32”
“C:\MyWorkspace\edk2-platforms\Platform\BroxtonPlatformPkg\Common\Tools\nasm\Win64”
- Install the ACPI Source Language (ASL) compiler:
- a) Install the IASL 2016-09-30 compiler from acpica.org:
https://acpica.org/sites/acpica/files/iasl-win-20160930.zip
- b) Unzip the “iasl.exe” file into the directory below, and create the folder if it does not exist:
“C:\MyWorkspace\edk2-platforms\Platform\BroxtonPlatformPkg\Common\Tools\Iasl”
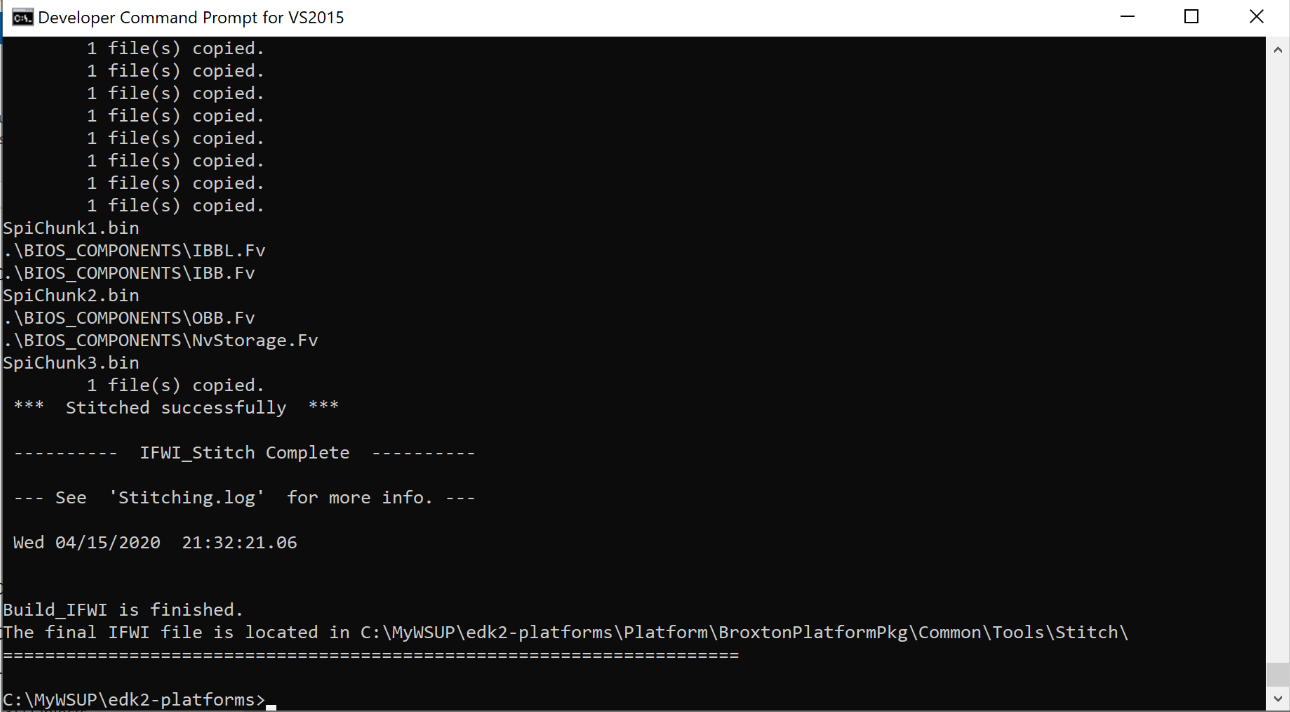
At last! All that’s needed now is to type in the following commands from the “Developer Command Prompt for VS2015” that you established above:
C:\> cd C:\UP2\edk2-platforms
C:\UP2\edk2-platforms> BuildBIOS.bat /vs15 /UP /A /x64 Broxton Debug
And then let it run for 15-20 minutes. It’s so gratifying to see the build results:
In my next article I’ll demonstrate how to use this debug image on the UP Squared board with SourcePoint, and do some interesting things with debug and trace.