This week, I poke around the code from the reset vector, in the heart of the CPU initialization firmware, and try to reverse-engineer what is going on.
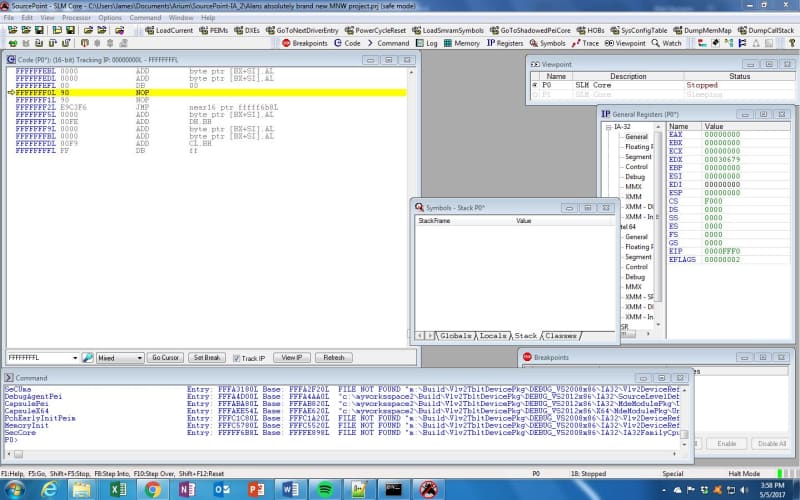
Using our JTAG hardware-assisted SourcePoint debugger, it is easy to power-cycle the Minnowboard target and have the system stop right at the reset vector, which is at the well-known address X’FFFFFFF0’L. A screen shot of the SourcePoint Code view at the reset vector is as below:
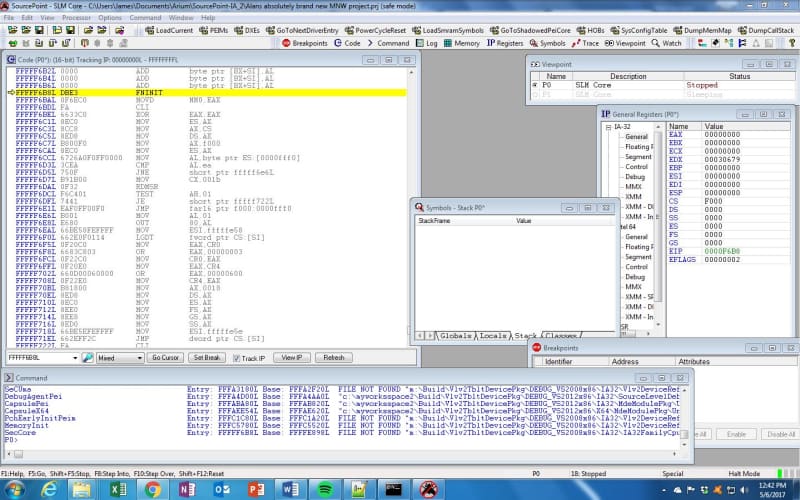
The processor executes two NOP instructions, followed by a JMP to address FFFFF6B8. This is where some interesting code shows up:
At the bottom of the screen, in the Command window, some of the last few lines are displayed where I’ve loaded the symbols into SourcePoint for the PEI modules. Note that the SecCore module has the entry address of FFFFF6B8, which is exactly where we are in the Code window. Note also that even though the Code window is in “Mixed” mode where we should see both source and object code, there are no symbols visible; you can see the “FILE NOT FOUND” in the Command window, which means the .pdb file is not available. This makes a lot of sense, since SEC (the UEFI Security phase) is the root of trust. So, this is part of a “binary blob”, and all we have is the assembly language code to look at; but we can still peek and poke around and use SourcePoint to get some useful insights into what the platform is doing right out of reset.
The Stack Frame window is empty; this is because we are executing hand-crafted assembly code within the SPI flash, and there is no memory available for a stack yet.
The first instruction initializes the floating point unit (FPU).
The next few handful of instructions are the following, with my comments:
MOVD MM0, EAX // Stores the value of EAX into MM0 register
CLI // Clear the interrupt flag in the EFLAGS register
XOR EAX, EAX // Ensures there are all ‘0’ stored in EAX
MOV AX, CS // Puts the contents of the code segment register (F000) in AX
MOV DS, AX // Puts F000 in data segment register
MOV AX, F000 // Puts X’F000’ in EAX (note it was already there)
MOV ES, AX // Puts X’F000’ into “extra segment” register
MOV AL, byte ptr ES: [0000fff0] // Moves X’90’ into the first byte of EAX
CMP AL, EA // Compares X’EA’ to the first 8 bits of EAX (X’90’)
JNE short ptr FFFFF6E6L // If not equal (they are not), jumps to FFFFF6E6
MOV CX, 001B // Loads CX w/ X’1B’; address of IA32_APIC_BASE
RDMSR // Reads contents of MSR into EDX:EAX
TEST AH, 01 // Compares EAX second byte (BSP FLAG) to ‘1’
JE short ptr FFFFF722L // If equal, jump to FFFFF722
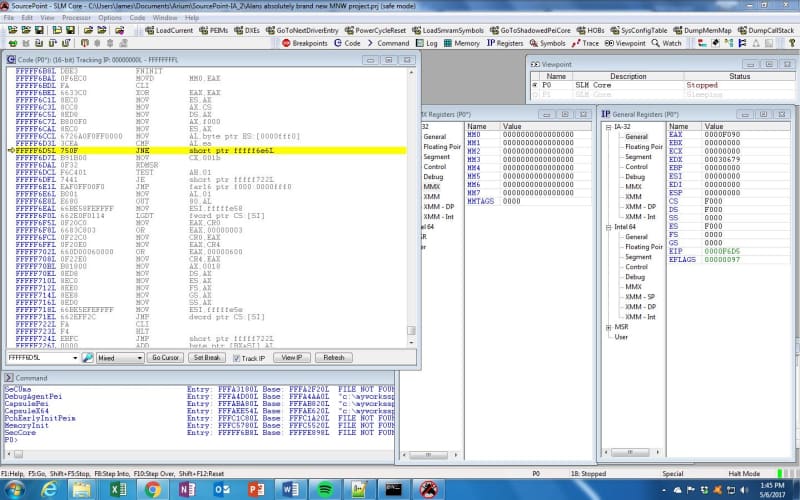
By single-stepping through the code, I can see the contents of the general-purpose registers (GPRs) changing and confirming what I think is happening. On every single step, the registers whose values change appear in green:
As expected, the code immediately after the JNE is not executed; instead, the CPU jumps ahead to address FFFFF6E6, and a lot more code executes.
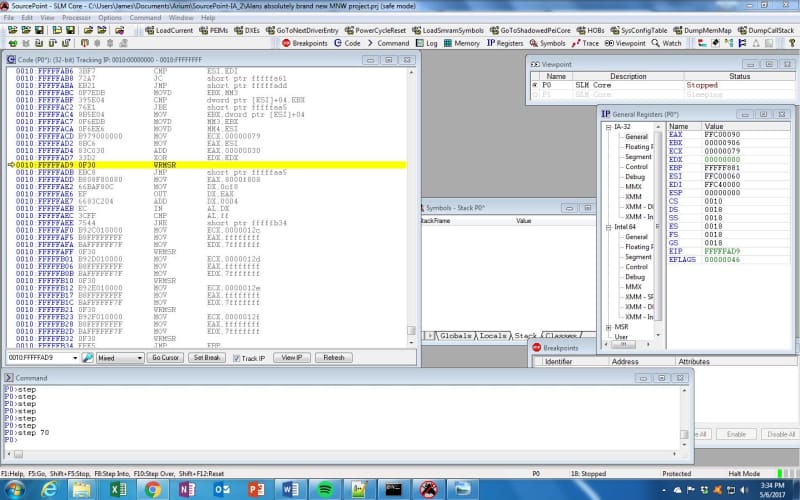
Further single-stepping through the code and reverse-engineering it is a task for another day; for now, I decided to jump ahead and use the SourcePoint built in “step n” command, which allows me to step through “n” instructions.
After about X’80’ steps through the code, I came across something rather interesting: a write to the MSR at address X’79’, the IA32_BIOS_UPDT_TRIG MSR. According to the Intel Software Developer Manual, this causes a microcode update to be loaded into the processor.
But, as I tried to single-step through the MSR write instruction (WRMSR), the Minnowboard went into never-never land; I tried repeatedly, but could never successfully single-step through that WRMSR, without the platform hanging. The only way to recover the target was to power-cycle it.
I did find that I could “game the system” by changing the target of the WRMSR to a different MSR address, but that is a topic for a future episode.
This is pretty cool, isn’t it? Please feel free to make my employer happy by downloading a free eBook, such as Hardware Assisted Debug and Trace within the Silicon (note: requires (free) registration).


